
Arclight instructions

Training videos
Many clinical training videos are available on both the Arclight Project website and on Geeky Medics
3 modes: default, eye specialist and ear specialist
LED lights
The Arclight includes 3 LED lights
- Warm white light for ophthalmoscope
- Bright white light for otoscope / loupe
- Blue light for loupe and use with sodium fluorescein (NaFl) drops
Robust ‘daylight’ white LEDs give superb true-colour rendering of external tissues whereas softer ‘warm’ white light is better for examining the fundus. Because LEDs are low in infrared, ultraviolet, and short-wavelength blue light this gives both a safe and comfortable examination.
Different levels of brightness are available for both white lights.
Warm white light (ophthalmoscope):
- The highest brightness level is ideal for assessing the fundal or red reflex
- Lower brightness level works well for fundoscopy (viewing the back of the eye)
Bright white light:
- Highest brightness level ideal for otoscopy
- Lower brightness level ideal for using as a loupe to view the anterior segment (front of the eye)
Flashing lights:
- This setting acts as an attraction or fixation target – especially for children
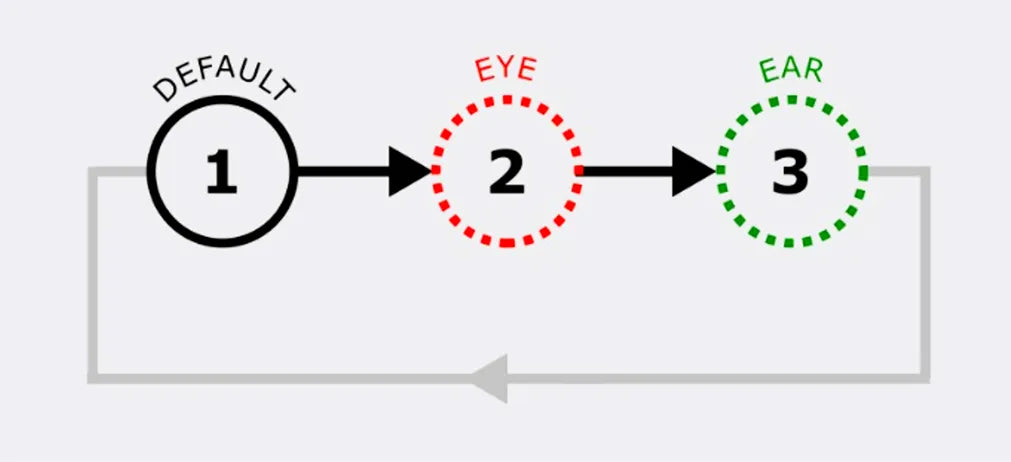
3 Arclight modes
The Arclight has 3 modes (Standard, Eye & Ear) – the difference is which lights come on first.
In ‘Eye’ mode the ophthalmoscope light comes on first, in ‘Ear’ mode the otoscope light comes on first. In all modes the user can click through the other light combinations to select the one they want. If you leave more than 6 seconds between clicks the lights will turn off at the next click instead of moving to the next light combination.
STANDARD – 4 light combinations
- Both white lights (cover one you don’t need with your hand)
- Brighter warm light for ophthalmoscope + blue light for loupe
- Otoscope / loupe white light
- Flashing blue and white lights for loupe
EYE – 7 light combinations
- Low brightness warm light for ophthalmoscope
- Medium brightness warm light for ophthalmoscope
- High brightness warm light for ophthalmoscope
- Low brightness white light for loupe / otoscope
- High brightness white light for loupe / otoscope
- Blue light for loupe
- Flashing blue and white lights for loupe
EAR – 7 combinations
- Medium brightness white light for otoscope / loupe
- High brightness white light for otoscope / loupe
- Low brightness white light for otoscope / loupe
- Low brightness warm light for ophthalmoscope
- High brightness warm light for ophthalmoscope
- Blue light for loupe
- Flashing blue and white lights for loupe
Changing between modes
- Press and hold grey button for 15 seconds
- Release button – light will flash.
- Click button once to advance one mode.
To advance two modes you will need to follow the process again (i.e. press and hold grey button for 15 seconds again followed by one click once light flashes).
Ophthalmoscope lenses
Use the low brightness light to see the macula in smaller undilated pupils or with light sensitive patients. The high beam light is ideal for a wider general examination with larger or dilated pupils.
We recommend leaving the lens slide set to the top (no lens position) as this is most commonly used If the person has glasses or contact lenses it is best to examine through them but the other lenses are also available if the person has uncorrected refractive error.

Lens slide settings:
- Lens slide fully up: sets the 0 (no lens) – best for viewing the fundus of a normally sighted person or when the overall refraction is about -2 and into the plus range.
- Lens slide fully down: sets the +4 lens – ideal to see the media and reflex. It also helps see the fundus of hyperopic eyes easier.
- Between: are two minus lenses (-3 & -6) to get a better view of the fundus of myopes and the dot setting is equal to zero (but the best view for 0 refraction is with no lens at all).
Otoscope
To use as an otoscope push fit a speculum over the daylight white light (small for infants, large for larger children/adults).
Hold the Arclight like a pencil – which gives good control when using as an otoscope.

Additional features
The Arclight has several additional features to support clinical use:

Ruler - useful for general measuring including assessing intra-pupillary distance
Pupil size gauge – for assessing difference in pupil size in light and dark conditions
Bird fixation target – for assessing a child’s fixation on for example a moving object
Convergence line – for identifying point of convergence
White target – for testing limits of visual field
Red target square – for determining difference in optic nerve function between the two eyes
Ratio scale – to help assess the cup-disc ratio and extent of any optic disc cupping
Colour strip (on side) – to help assess colour vision
Charging & storage
The Arclight can be charged by Solar or USB. Full charge is achieved in about 20 minutes via USB or in a few hours in good sunlight.
A green light is visible when the device is charging (both USB & Solar)
Charging guide
To charge via USB please use the included USB A to USB C cable that comes with your Arclight or any 3rd party equivalent cable.
Compatible charging sources included:
- Laptop USB A port
- Desktop computer USB A port
- USB A port on a TV or Computer Monitor
- USB wall plug with a USB A output
Important: USB C to USB C cables or charging sources are not compatible. Please only use USB A to USB C cables and USB A power sources such as a port or plug. High-output “smart”, fast-charge or Power Delivery (PD) chargers (now provided with many smartphones) are also not compatible.

Storage & battery care
The Arclight uses a lithium-ion battery similar to a smartphone’s that slowly loses capacity with use and age.
To keep the battery in good condition, charge for 20 minutes via USB every three months when it’s in storage or only used now and then. If it’s kept somewhere warm (above 30 °C), top up the charge monthly.
Store in a cool, dry place if you are not planning on using it for a while. It can handle heat and cold but, as with other devices, prolonged exposure, especially to heat will shorten battery life.

Power saving mode
If the Arclight hasn’t been used in a few weeks it will enter power saving mode to protect the battery. This will mean the Arclight will need to be put on charge for a few hours before the next use / to revive the battery.
Phone clip
To attach the phone video clip to your phone:
A. Assemble Arclight, phone and clip
B. Remove paper from sticker and bend the arrow on the clip slightly to weaken the hinge
C. Looking directly from above align the arrow tip with the centre of the camera lens and stick firmly down
D. Remove black arrow
E. Switch Arclight on and attach using the elastic
F. Slide Arclight toward camera aligning sight hole to lens

A video demonstrating the process is on the Geeky Medics site
You can use the phone clip with both the ophthalmoscope and otoscope/loupe ends – just turn the Arclight around to the end that you want.
For ears, switch the camera’s auto focus off and manually focus to ~60mm.
Visual acuity chart
The cloth chart has a letters chart on one side which includes both Snellen and LogMAR values along the edges.

On the other side is a tumbling E chart (also with Snellen and LogMAR values) which is particularly useful for small children or those who do not use the Roman alphabet in their first language.
The chart is designed for use at a distance of 3 metres from the patient (which can be estimated through 3 large steps or measured with a tape). The chart can be attached to a notice or magnetic board whilst in use.
How to assess visual acuity video
Recording visual acuity
Start with the largest letters at the top of the chart working downwards. Stop the test when the patient can no longer correctly identify the letters or indicate the direction of the E’s,
Now record the Acuity achieved – the left side of the chart is labelled in Snellen notation with Logmar on the right
Snellen is recorded as a fraction with a test distance on top (in this case 3 metres) and the last full line seen correctly on the bottom. If some of the next line was also seen then write +1 or +2 for the extra letters seen.
For Logmar – again record the last full line read correctly but this time subtract 0.07 if they managed one extra letter correctly or 0.14 if they saw two additional letters.
For example if the patient read the 4th line down all correctly (Snellen 7.5, LogMar 0.4) and then two of the letters or E’s in the next line down the visual acuity would be recorded as Snellen 3/7.5+2 or LogMar 0.4-0.14 = 0.26.